For all Dell XPS Desktop users looking for the best audio performance, knowing the different audio jacks is essential. This article will explain these audio ports.
Check out this overview of the Dell XPS Desktop Audio Ports:
Audio PortDescription
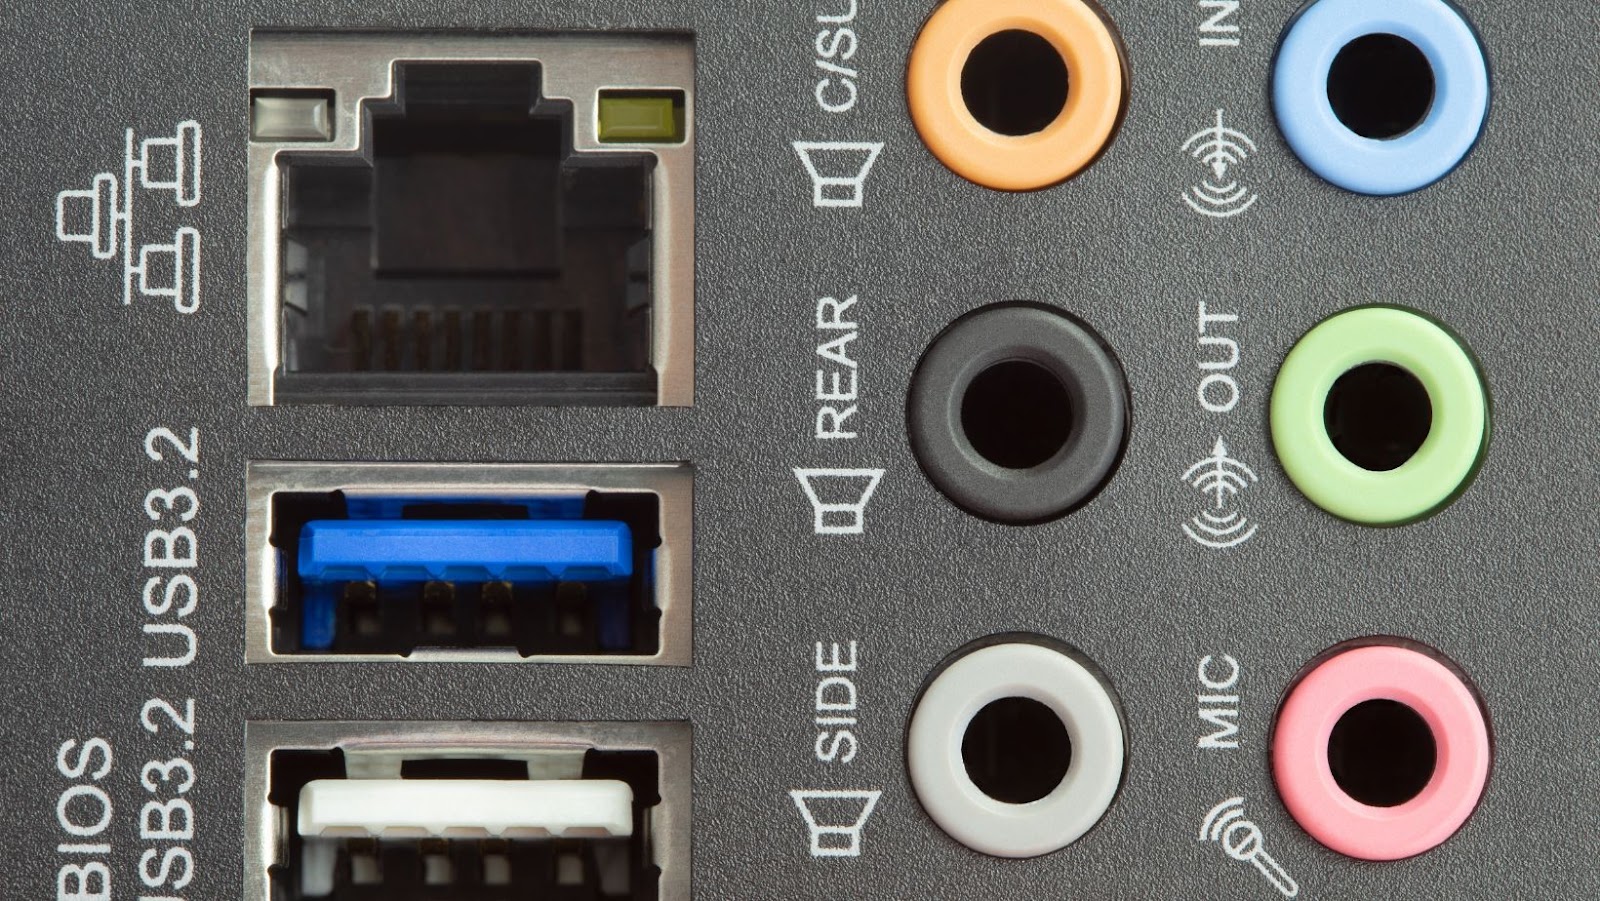
Line-Out Jack/Headphone Jack
Microphone Jack
Line-In Jack
Optical S/PDIF Output Connector
It’s important to know the special roles each port plays. That way, you can get the most out of your audio and enjoy a truly immersive sound experience for gaming and overall PC usage.
Pro Tip: Get better sound quality by connecting digital speakers or receivers with a coaxial or SPDIF cable to the optical S/PDIF output connector, instead of using simple analog speaker cables.
“Ahoy, matey! The Dell XPS Desktop has more audio ports than a pirate ship!”
Types of Audio Jacks on Dell XPS Desktop
Paragraph 1:
The Dell XPS Desktop features multiple audio jacks that offer different functionalities.
Paragraph 2:
The following table displays the different types of audio jacks on Dell XPS Desktop, along with their respective functionality:
Audio JackFunctionality
Line Out Used for audio output to external speakers or headphones.
Line In Used for audio input from an external device.
Microphone Used for audio input from a microphone.
SPDIF Used for digital audio output.
Paragraph 3:
It is important to note that the Line Out jack on the Dell XPS Desktop also doubles as a headphone jack. Additionally, some models may have additional jacks for surround sound systems.
Paragraph 4:
Pro Tip: Select the correct audio output/input device in your computer’s settings to optimize sound quality. Plug it in, play it loud, and nobody will know you’re secretly listening to Barbie Girl on repeat through your Line-In jack.
Line-In Jack
A Line-In Audio Connector is a 3.5mm port that transfers analog audio signals from an external device. It’s commonly found on Dell XPS desktops and enables users to record high-quality sound.
It has a higher voltage than the Mic Input, producing better signal-to-noise performance during recording. Adjust the input volume and gain settings via Windows’ sound card control panel or third-party software.
Be aware that Line-In ports don’t provide power to the input device. To avoid interference, keep unshielded cables away from power cables.
Pro Tip:
- Mute the device initially when connecting it using the Line-In Jack.
- Gradually increase the volume and gain until clear, distortion-free audio signals are heard from the source.
- Plug it in, plug it out, Line-Out Jack’s still the one to shout!
Line-Out Jack
One of the audio jacks on a Dell XPS Desktop is for line-out functions. It’s an output port to connect speakers or headphones and is usually found on the back panel of most models.
Line-out jacks are designed to produce sound with high quality. This is great for music lovers, audio engineers, or content creators who need accurate sound. It also lets users adjust the volume without affecting other devices connected to the computer.
The line-out jack has analog signals for good-sounding audio output. That means clear and crisp sound with no distortion. This feature gives users control over their audio preferences and makes it easy to monitor or playback recordings.
Pro Tip: Match your line-out device with your speaker or headphone specs for the best results. And finally – the microphone jack to plug stuff in on your Dell XPS Desktop.
Microphone Jack
The Dell XPS Desktop has a port known as the Recording Jack. It’s like a Microphone jack, which takes input from microphones or other audio devices. You can plug in an appropriate cable, capture audio from the connected device, and store it on your computer.
The Recording Jack is a part of your sound card, and you can use it to record media by connecting various audio devices directly to your computer. It can capture sounds from both analog and digital devices.
However, unlike a traditional line-in or microphone, the recording jack does not amplify signals. As a result, most users of Dell XPS desktops found the Recording Jack satisfactory for basic audio recordings. Plus, all Dell XPS desktop models come with at least one recording jack as standard.
So plug in your headphones and dive into the world of sound!
Headphone Jack
Dell XPS Desktops feature a popular 3.5mm audio jack, the headphone jack. This type of connection is used to plug in wired headphones or speakers. It produces a stereo signal and can support different levels of impedance. However, not all headphone jacks are the same, so check compatibility with your device.
Depending on your hardware configuration, the headphone jack may also be a microphone input. This can help record audio and monitoring through headphones. But, again, accessories or adapters may be needed, depending on the design or connectivity of the headphones.
Pro Tip:
- Adjust the volume levels when using the headphone jack on a Dell XPS Desktop.
- Start at lower levels and gradually increase as needed.
- Monitor sound quality to avoid hearing damage or distortion.
- Plug into great acoustics with these tips on using Dell XPS Desktop audio jacks.

Dell XPS Desktop Audio Jacks What Are They
Dell XPS Desktop Audio Jacks: A Guide on Their Proper Use
To properly utilize the audio jacks on your Dell XPS desktop, follow these six simple steps:
- Identify the type of jack you need to use. The XPS Desktop has various audio jacks: line-out, line-in, microphone-in, and headphone jack.
- Plug in your audio device into the correct jack. Confirm the correct jack by referring to its label and color.
- Configure your computer’s audio settings. Open the sound settings and choose your audio device from the list of available options.
- Test your audio. Ensure that the audio from your device is being output correctly through the selected audio device.
- Adjust the volume. Use the volume adjustments on the computer or device to manage the volume according to your needs.
- Unplug your device when finished. When you are done using the device, unplug it from the jack and store it in a safe place.
It’s important to note that some audio devices may not work correctly with your Dell XPS desktop. You may need to consult customer support or try a different audio device in such cases.
To prevent damage to the audio jacks, handle them carefully when plugging and unplugging devices. Keeping your desktop and audio devices clean and dust-free can also help ensure optimal performance.
Following these guidelines, you can properly utilize the audio jacks on your Dell XPS desktop and enjoy high-quality sound from your favorite audio devices. Then, get ready for some eargasmic beats by connecting your fancy speakers or headphones to the Dell XPS’s Line-Out or Headphone Jacks!
Connecting External Speakers or Headphones to Line-Out or Headphone Jacks
Utilize the audio jacks on your Dell XPS desktop by connecting external speakers or headphones to the Line-Out or Headphone jacks. Here’s how:
- Turn off both your computer and external speakers/headphones.
- Locate the audio jack on the Dell XPS Desktop – usually at the back.
- Plug your external speakers/headphones into the Line-out or Headphone jack.
- Turn on your computer and check if it produces sound.
For extra sound options, like volume and tone settings, consult the manufacturer’s user manual.
In case of connection issues, check for PC, Audio drivers, or Speaker/Headphone firmware updates.
Remember: never disconnect or connect peripherals while the computer is powered on to avoid electrical damage.
Fun fact: 3.5 mm audio jacks have been around since the late 19th century, used initially as telephone switchboard plugs. Now, plug in that external mic and tell your story to the world!
Connecting External Microphone to Microphone Jack
Do you want to use an external microphone with your Dell XPS desktop? Here are easy steps to do so:
- Find the microphone jack on your Dell XPS desktop.
- Plug your external microphone into the jack.
- Choose “microphone” as your input device in your computer’s sound settings.
- Test your external microphone by speaking into it. Adjust the volume if needed.
Also, select the right input source in any audio or video recording software you use. This will help you record clear, high-quality sound from your external microphone.
If you have trouble connecting or using your external microphone, read the Dell XPS desktop manual for troubleshooting tips and solutions.
Fun fact: Alexander Graham Bell created the first microphones in the late 1800s. These early microphones had a diaphragm in front of an electromagnet. Nowadays, microphones have more advanced technology but still follow the same principles.
Finally, plug it into the Line-In Jack on your Dell XPS Desktop if you want to make your music sound even worse.
Inputting Audio to Line-In Jack
Connecting audio input devices to your Dell XPS desktop is easy, just use the Line-In jack! Here’s the how-to:
- Turn off your audio device and set volume to zero
- Locate the Line-In jack at the rear of your Dell XPS desktop
- Plug one end of an audio cable with a 3.5mm stereo mini plug into the Line-In port of your Dell XPS
- Connect the other end to the audio device’s output port (labeled “Audio Output” or “Line Out”)
- Turn on your audio input device and slowly increase the volume
- Open ‘Sound settings’ in Windows and select ‘Line-in’. Test your device by speaking into it -if levels are good, you’re done!
You can easily connect audio input devices such as mics, mp3s, and external speakers using the Line-In jack on your Dell XPS desktop. Just remember to turn them off before plugging them in!
Pro Tip: If sound isn’t up to par, check your recording software settings and/or try another Audio Cable or input device. You’re sure to find the perfect sound-fix!

Troubleshooting Common Issues with Dell XPS Desktop Audio Jacks
Dell XPS Desktop Audio Jacks pose common issues affecting the audio experience. By understanding the different audio jack types and identifying their specific functions, troubleshooting common issues like improper sound output or unrecognized devices can become a breeze. In addition, it is important to inspect each audio jack’s connection, identify the right port type and check the device’s compatibility. Combining knowledge and problem-solving can help users overcome audio issues and improve their experience.
If you can’t hear a pin drop from your headphones or speakers, it’s time to check your audio jacks – the culprit could be lurking there.
No Sound from Headphones or Speakers
Is your Dell XPS desktop audio jack not producing sound? It could be a hardware or software issue. Here’s a 4-step guide to fix it:
- Ensure the audio jack is firmly plugged in.
- Check if the headphones/speakers work on another device.
- Visit Dell’s website to update the audio driver.
- Reinstall the driver if it’s malfunctioning.
If the issue persists, the sound card or motherboard may have an internal hardware fault. To avoid this in the future, don’t use too much force when inserting/removing audio jacks or cables. Also, keep your drivers up to date and be aware of external factors like dust and debris which could damage your system.
Following these steps, you can ensure your Dell XPS desktop has a consistent audio experience with headphones or speakers. Troubleshoot low volume and distorted sound if it’s not up to par.
Low Volume or Distorted Audio
Check if your Dell XPS desktop audio is muffled or weak. There might be underlying causes. Tighten all connections. Check if software settings are correct. Muted or wrong speaker settings can reduce audio quality or no sound. Test your speakers on another device to know if the problem is hardware-related.
These steps are also for other desktops and audio systems. Double-check connections and software settings before replacing hardware to get the best audio system. It avoids costly repairs and you can enjoy uninterrupted high-quality sound.
Microphone not Working or Low Volume
Dell XPS desktops can have audio jacks issues with mics. Here are common problems and solutions for ‘Microphone Not Working or Low Volume’:
- Incompatible mic? Check if it’s compatible with XPS. Might need specific drivers.
- Settings incorrect? Check audio settings and make sure mic is default recording device. Don’t forget to check volume levels.
- Hardware fault? Try using a different pair of headphones or external speakers.
- Are drivers up-to-date? Make sure they are, through Device Manager or a driver update software.
- Any third-party interferences? Analyze that.
Also, specific applications might cause issues with the mic. Check mic settings in the app.
If these don’t help, IT support could be consulted. Listen to equipment for clues while troubleshooting. The Dell XPS Desktop Audio Jacks will offer an uninterrupted audio experience.